Can you just pinch me right now? ‘Cuz I just wrote the title of this post and I HAVE A NEW KITCHEN!!!! EEEEKKSSSS!!!! WOOOHOOOO!!!! I can’t even BELIEVE IT! I feel like Rapunzel getting out of her tower. (Don’t we all feel like Rapunzel these days?!!!) But I could squeal I am so happy to be through this process and coming out with the beauty that is the heart of our home.
Have you ever gone through construction? As someone said, “It’s like childbirth: the process is PAINFUL and HORRIBLE but once it is done, you realize it’s all worth it!” Now, try going through construction, in the middle of winter, during the Coronavirus outbreak?!!!! HOLY CRAPOLA! No eating out? Will our contactors stop coming? Will they not be ALLOWED to come? Will I be cooking crockpot meals and microwaving food in my garage for 3 meals a day while trying to school my children F-O-R-E-V-E-R???? I mean we all have superpowers, but this is NOT MINE!!!!
Well, I am happy to say, the contractors still came. I think there was ONE glitch we can blame on the Covid-19 and that is the fridge. But other than that…everyone still came and the project stayed relatively on time (minus a few unplanned days which we will get to in a bit…)
Order of Appearance
Here is the order for which everything happened:
- Demolition
- Plumbing
- Electrical
- Drywall
- Cabinet Install
- Counter Template
- Painting
- Counter Install
- Sink install
- Floors
- Plumbing-connect all water and gas lines
- Appliances
- Lighting Install
- Hardware & Shelfing Installed
Planning
Layout
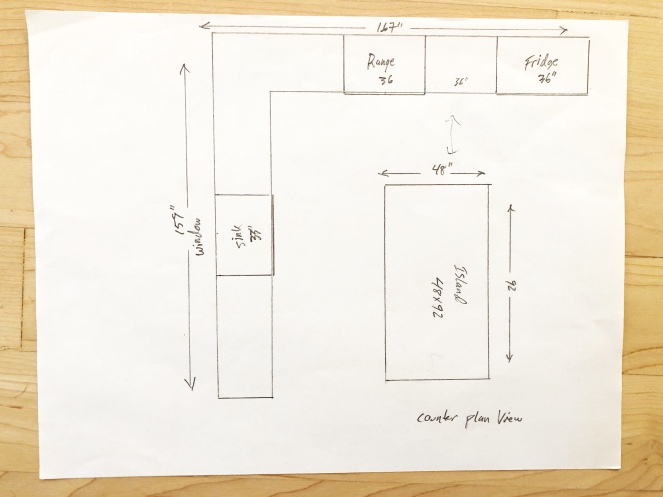


Before ALL OF THAT “Order of Appearance” above, you must plan out your space. We worked with our cabinet guy, Dan, to design and reconfigure our kitchen. The biggest change was sliding the refrigerator to the “right” of where it was and moving the stovetop from the middle of our island to a wall range unit. We also moved our microwave to our island from the wall which should not have been a big deal. Easy peasy, right? We already had electrical going to the island. NOPE. FIRST HICKUP: when we changed the microwave from a regular convection oven to the Miele Super Oven, the power it required was greater than the power already plumbed to the island. Oiy vey. The electricians had to run another line under the house at the last minute. LESSON: always check the specs for your appliances WHEN your contractor is present.
LESSON: always check the specs for your appliances WHEN your contractor is present.
Inspiration


When your contractor comes for the first time, it is a good idea to have “inspiration photos”, spaces that you LOVE! Spaces that you want your remodel to feel like. This will help your contractor better understand what your vision is for your space. It will define your style. It will tell the story of your family. Look for cohesive details in each of those photos.
- paint colors
- hardware
- lighting ideas
- backsplash/tile details
- appliances
Those details will define your style. All of these elements don’t need to be chosen right away but you definitely want to start narrowing down your decisions once D-day is here.
Demolition Day!


D-Day is HERE! Number 1: be prepared for a BIG MESS! Your “once so organized house” will become a tornado of chaos! For us, it was the middle of winter so we planned to eat out a bit but we took advice from a neighbor friend and set up a “kitchen in the garage”. In the car stall closest to the entrance to our house, I had an L-shaped table set up with wipeable tablecloths. On one end were all the appliances we would us: microwave, toaster, crockpot, blender, rice cooker & sandwich maker. On the other table where our essentials: a tray with 4 plate, 4 bowls, 4 sets of silverware, a basket of tinfoil, zip locks, etc., grab-an-go snack jar, fruit bowl and a tray of spices. Under the table we had some non-essentials that we pulled out when we needed a change (can you say waffle maker, you are a dream!).

Gorgeous, right? Ha!
Feed your workers. We invited a few friends to help with demo. I mean, what man does not like to take a sledgehammer to something?! Oh, I wish I had a picture of our friend Dave when he walked in, with his hard hat, steel toed boots, safety goggles and sledgehammer over his shoulder! I was laughing too hard to think of “capturing the moment“! 🙂
Plumbing
Not exciting. No pictures. William did his job, went under the house, plumbed from the island to the wall for our gas stove, capped all the water lines and that’s about it.
Electrical


If I could give any day a name, this one would be called Circus Day. Not that there were three rings, but these guys are characters. Pan faced, they found everything wrong with the “last job that was done” in this kitchen by the previous owners. Canned lighting just stuffed into the ceiling and sheet rocked in, live wires in the ceiling, … these guys kept pointing out “weird things” the whole day. They also kept complaining that this job is bigger than they thought it was going to be. “We were told this was a 1-day job. There is no way we can do all of this in 1 day. And we are booked! I don’t know when we are going to be able to come back and get this done!” I was sweating.
Come to find out, this happens with every job guys do. They do great work but sometimes there’s some moaning… 😉
The next day: they came back. WHAT?!!! HALLELUJAH! I asked them, “What happened?” He said the owner of the house they were supposed to go to that day was “sick” and they weren’t going to even mess with the chance that she might have the Coronavirus! I never did find out if she really did have the virus and if they ever went to complete her job. But I was happy they were able to get my job done. On to the next line item!
Drywall


Oh, those poor drywall guys. Jesus. Such a sweet guy. Their portion too, took a little longer than they expected. Because of the “hidden can lights in the ceiling“, our electricians had to “swiss cheese” the ceiling (you can see in the previous photos) to rewire the new locations for the pendant lights. And, because the previous countertops were built 3″ higher than average height, all our outlet plugs needed to come down as well. There was a LOT of repair. The job took 2 days…they worked on a Saturday, bless their hearts.
LESSON: if there is a lot of repair to do in the ceiling, the whole ceiling will need to be retextured and painted. DISCOVERY: did you know they texture the ceiling on stilts?! I was in awe of their balancing skills! 🙂
LESSON: if there is a lot of repair to do in the ceiling, the whole ceiling will need to be retextured and repainted.
Cabinet Install


One week after demo, Dan’s yellow vintage truck rolled up to our house with our kitchen puzzle ready to be pieced together. Oh, what a sight! Now the remodel was really starting to take shape. Can I just share that the smell was amazing!!!! Fresh cut birch. Aaaaahhhh!!!! It was delicious.
With classical music playing, Dan installed the lower cabinets first, the upper cabinets the next day and the island went in last. Somewhere during all that, the shelving unit and the mantel were also installed. He planned where the speaker wires would go and what last minute holes needed to be drilled. He really had everything installed within 3 days, gave himself a cushion of 4 days and THOUGHT the fabricators were coming on friday. Unfortunately, the fabricator’s schedule could not accommodate and they came the following Monday.
But overall, everything was coming together.
Countertop Template


The week before, I had received an email with a “rough” outline of where the slab would be cut. I was questioning one of the cut locations. This is key to what transpired…
Paul, the contractor, came and templated the countertops. It was a really interesting process. First, he measures all the cabinets. You will need to know where you want the faucet, the hot water tap (if applicable), the air switch for the garbage disposal (if applicable) and soap dispenser (if applicable–we did not have one installed). We had the farmhouse sink already purchased and onsite, so we put that in place (well…Dan, my contractor put that in place. Thank you, Dan! That stinker’s heavy!!!) and we measured exactly where the counter would end according to the farmhouse lip.
LESSON: Have sink already purchased and onsite for the measurement.
LESSON: Have sink already purchased and onsite for the measurement.
Talking to Paul, I expressed my concern as to the cut they had “sketched” to the left of the sink. I asked if it was possible to have the cut go behind the sink, where the faucet will be. He confirmed that was exactly what he was going to suggest. As well, the cut to the right of the sink would then extend all the way to the wall, and the new piece would start on that seem. It is hard to describe in words, but LESSON: be present for the templating, ask questions and really think out the layout on the spot.
To template, he has thin boards, like balsa wood, 3″ wide which he cuts to the size of the counter. Once all the pieces are cut, he then hot glues them together to form the template or “cookie cutter” pieces of our counters. Those cookie cutter pieces go back to the fabricator’s warehouse. The day they were scheduled to cut my stone, I went down to Portland Marble Works and placed those pieces EXACTLY where I wanted them on our two slabs. Because we have large veining in our Calacatta Nuvo Caesar Stone, we needed to make sure the seams were as “blank” as possible. This assures the seam will disappear or “blend” the best. If a large gray line was on one cut edge and then glued to a piece that did not have veining, it would not flow. You want your slab to look as close to one continuous piece as possible. Does that make sense? LESSON: make sure there is little to no pattern on seem edges of your slab templates.
THREE LESSONS FOR TEMPLATING: 1. Be present for the templating. 2. Visit the fabricator before they cut the stone and place your template pieces exactly where you want them on your slab. 3. If you have veining, make sure there is little to no pattern on your seem edge.
Painting


Now that the cabinets are installed, they now get taken APART! Yes, all doors and drawers get disassembled and set up for the painters to do their magic. Prep took the majority of the first WEEK! Not kidding. 5 days of taping, masking, caulking and sanding. Once that was done, Marcos and Jesus (not drywall Jesus, but painter assistant Jesus. Can you say our job was “in very good hands”? 🙂 ) came on their Saturday to paint the first coat–and boy was it STINKY!!!! My husband parked the trailer in our driveway for us to sleep that night (though my daughter and I slept in my room, bedroom door closed and windows wide open! It was still so awful!). The next few days were not as bad because they were using regular water-based paint. It was just that first day!!!


Once the cabinet frames were painted, the cabinet doors were lined up on racks and painted individually. All the baseboards were also painted as was the ceiling. (Remember the “swiss cheese” incident?) To save money, my husband said we would paint the walls. The following weekend we whipped those out in the 1 day we had before the first day of spring break, when the cabinet doors were getting re-installed, the counters were getting installed and the hardwood floor guys were coming to start prepping the whole first floor of our house to be sanded, refinished and resealed! Boom boom BOOM! No time to waste!


Counter Install


THIS! This was what I was waiting for: the counter install! Before we even decided to do a full kitchen remodel, I had proposed just changing out the counters and backsplash to the more current trend (and classic choice) of white marble. Well…not truly marble. I do not trust our family to be able to take care of a marble counter. But the “man made to look like marble” products are also very stunning.
When choosing our counters, I went to the only place we have gotten slabs from since we lived in Portland, and that is EleMar Oregon. They have an amazing selection of their own Quartz products as well as Caesarstone, which is what we went with for this project. I brought home 4 different slab samples and each of our family members chose a different “favorite” (of course! geez!). We all compromised and ended up with Calacatta Nuvo, a more subtle veining pattern with warm undertones. (At our Sunriver place, we used Frosty Carrina which has light specs of gray in an overall white slab.)
As they brought that solid island slab into my new kitchen, I think I was drooling. It is gorgeous!!! Another wonderful thing that I did not know would be the case was the contractor that templated our house was also HERE to install! Paul was back! I cannot tell you how happy that made me and comfortable that the job would be done right. He was the one that was familiar with the job and now he was back to make sure his measurements went in exactly how he/we had talked about.
LESSON: Install takes about 4-5 hours.
Flooring


Yep. We had to clear out our whole first floor of every nook and cranny. Furniture, rugs, pillows, lamps all got spread around the second floor or garage of our house. It was like a little treasure hunt after everything needed to get moved back into place! Oh, how my husband loves his games, even when he doesn’t know he’s creating one! 😉
LESSON: IF we were to do this again, I would box everything up and place EVERYTHING in the garage, vs. spread throughout the house. Living in a scattered mess adds unwanted stress while you are living in it AND for after when you need to put everything back in place.
Even the pictures needed to come off the walls with fear that they would come crashing down from the vibration of the sanders or the guys bumping them while doing their job.

We had scheduled our floors to get refinished while we were away on Spring Break because to sand, refinish, reseal and cure, we had to be out of the house for 3+ days. What better excuse to escape to Central Oregon?!!!
But, even before we left for Sunriver, as they started sanding, I could see how beautiful the wood could be when brought back to its natural state and color. Maple would not be my first choice in wood floors, but I really like how light they can get when kept their natural color. One thing we lack in the Northwest is LIGHT. We have a lot of gray days and for me, I try to make my home as light-filled as possible. Bright lights, bright colors, bright finishes. For me, bright = happy. And do these new floors make me HAPPY!!!
Coronavirus & Our Schedule
By now, we were fully into the Coronavirus epidemic. Schools, restaurants, and unessential businesses were closed and had been closed for over a week. When the workers came to our house, we didn’t shake hands. They weren’t wearing masks, but they were keeping their distance, doing their job, and leaving swiftly.
Scott was working feverishly keeping the communication going for these last few steps just so nothing got halted or postponed. I had read (somewhere—there has been a lot of available information on this Covid-19) that plumbers and electricians were essential contractors. WHEW! ‘Cuz, I still needed lighting and water for this kitchen to function!!!!
We came back from Spring break to see the floors. But the tile wasn’s suppose to get installed for another week. The kids and I headed back to Sunriver. Why not? In Sunriver, it felt like we were on vacation. It was OK to not do laundry. It was ok to hang out by the fire all day and put together a puzzle or read our book. The kids and I had so much fun going for our daily walks and creating Art With Kids video tutorials to share with our friends, it was actually hard to come back. It was hard to come back because I knew there was a house with a new kitchen in it but the rest of the 3000some-odd square feet was a tornado of a mess!!! I do not function well in a mess.
Final Details
Plumber came and installed the faucet and gas to our oven.
Electricians came and installed the under-cabinet lighting, and some disco colored recessed lighting for inside the glass cabinets that John, the electrician, said could “change colors with the seasons if you wanted!” The only problem…it didn’t have white! LOL! We sent them back and ordered our own on Amazon, minus the color changing option. 😉 My husband installed them later that week when they arrived.


Hubbie also installed my AMAZING Stella Light fixtures from Ballard Designs. This was one of the easiest decisions. I actually had envisioned something TOTALLY DIFFERENT! But, this being a home where we all live, Scott wanted to pick them with me. I shared my pinterest board of ideas. He didn’t love anything. He asked, “Where did we get the breakfast nook light?” I said, “Ballard Designs.” So we went to their website, looked at brass pentants and both liked this one. BEST PART? They were 30% off! Oh yah baby! Put that in my shopping cart! Done! And the discount wasn’t even the best part, the BEST PART is that we both LOVE THEM! They are the shining stars in the final design. They have a vintage feel yet very current all at the same time. Now, THAT is my style.
LESSON: be true to your style and a compromise may lead to the best decision of the whole project.
Everything was in place with only 2 elements left to go in:
- The fridge (Remember the one thing that was affected by the Coronavirus? There once was a boat stuck in China…)
- The tile: kitchen backsplash and the fireplace hearth.
The Fridge
We were not getting much hope on if or when that “boat from china holding our fridge” was going to be here anytime soon. Basco wasn’t have any success getting answers on dates from their suppliers. So, my oh-so-smart husband thought “outside the box” and started calling around. First he called a small mom and pop shop to see if they had our fridge make and model in stock. They said no. “Only big companies would possibly buy inventory and store it in their warehouses.” Next, he called Standard Appliance. We had gone there initially to browse their showroom and get ideas. But, when I visited Basco, I fell in love with the business and the people so we just went with them for all our appliances…until now. When my husband called Standard to inquire about a fridge, a very friendly sales guy said, “Why yes! We have that fridge in stock! Would you like it delivered TOMORROW?”
Are you KIDDING ME?! YES, we would LOVE IT to be delivered TOMORROW!!!! Insert squeal and happy dancin’ mama!!!
LESSON: call around! If one place isn’t working for you, maybe someone else has the answer!
Hubbie called Basco back and told them our situation. They were super friendly about it. The rep we talked to said, “That’s smart to go with Standard. We have at least 40 orders that still needed to be filled, including orders placed way back in November that still did not have their Bosch refrigerator.” (You think there were 41 fridges on that boat from China?! Hmmm…)
The next day at 3:30pm, our new fridge walked through our front door and was installed into its perfectly cut place in our new kitchen! Yahoo!!!! Sigh of relief!
10 minutes later, Scott, my husband, walks in the house after a round of golf, opens the newly installed purchase and exclaims, “IT DOESN’T WORK!!!!!”
“WHAT?” I question. “The guys just left!!! He told me to ‘clear the water line with 3 gallons of water and let the ice maker go through 3 trays full of ice and then it would be suitable to use.’ ” I didn’t check it but I ASSUMED it worked!!!
Sure enough, the power did not work. Scott called the delivery guy and he agreed to stop by on his way home from his last job.
What we discovered is the refrigerator was wired to the GFI plug just to the left of the fridge. Starting Jan. 2021, all refrigerators are going to need to be on their own GFI switch. In this case, the refrigerator being connected with all the line of plugs around the backsplash needed too much power and tripped the switch. This was on the Friday before Easter. We placed a call to the electrician. We did not get a call till Monday (understandably seeing it was Easter weekend. Not that any of us could or were supposed to get together with even family members but still, it was a holiday.)
Come MONDAY, the fridge was capped off that GFI and now works just perfectly.
Tile


The LAST PIECE to the puzzle: the tile. TIP: always get multiple bids. Our cabinet guy had supplied us with all his fabulous contacts: plumber, electricians, drywaller, painter, but his main tile gal had “gone and got a full-time job” and was no longer available to install. Sadness. So, he gave us another guy’s number. IMMEDIATELY I KNEW. I JUST KNEW when this guy walked in the door, clean cut, put together with his new high-tech Columbia jacket “from his employees for Christmas” that this guy came from a bigger outfit than what we were used to using. He had an impeccable reputation. He recommended high-end tile companies like Pratt & Larson whose products were “custom, made-to-order”. When I said I had found the tile I wanted to use at CFM (Contract Furnishings Mart, a discount supplier for contractors), he said “he would take care of that for me and add it to the bid.” I JUST KNEW his bid was going to be high. And…yes. Yes it was. I haven’t bid out very many tile jobs, but when I opened the email, the number made my heart sink and my eyeballs bulge. I know difficult jobs. I am a hands-on designer. I know. But our job was not difficult. And therefore, the bid did not sit well with me.
LESSON: always get multiple bids.
I shared this information with Dan, our cabinet man. He, being the amazing man he is, asked around for other tile contractors and gave us another name from a General Contractor he works with quite often. I looked up the business name online and gave this new guy, David a call. He offered to come by 2 days later (at the tail end of a job he was doing downtown) and sent a quote within 24 hours.
Guess what? His bid was HALF the other guys! AND! Because I already had my product picked out from CFM, I ordered directly and saved the 50% mark-up the first guy was going to charge me.
I mean, I get it. The first guy is running a business. I was taught in freelancing to always mark up the printing. Well, as a trades person, I automatically get a discount on printing so the cost to my customers is minuet. But…when you buy from CFM, and you work with a contractor that has an account there, you already get the discount. So, we used Dan’s account and ordered directly. It worked out perfectly.
Back to David. He too, was fantastic to work with (and now we have a new contractor for Dan to refer and use for his future jobs!). Timely. Meticulous. Clean. Precise. David was great to have in our home. Backsplash and fireplace surround took 5 whole days. He was here at 9am and left at 3pm. Some of our other contractors were here at 8, home at 5. If needed he could have gone faster but there was also a delay in the arrival of our hearth tile. It all worked out.
End Results

Did y’all scroll to the end before reading all the details?!!!! 😉 You can’t skip to the end of a book to find out who dies!!!! That kills the fun out of the journey. It’s all about the journey, not the destination, right?
Check back FRIDAY to see the before and after pictures!!! Because who doesn’t love a before and after???!!!
xo, Melis

Can;’t wait to see the pics!!!
LikeLiked by 1 person
you bet!!! it’s been hard to get good photos with the whole family IN THE HOUSE!!! oh my!!!
LikeLike
yes!!! Friday!!! (did you see it yet?!?! 😉 )
LikeLike
Melissa, I love what I saw on your blog today! 💖
Everything looks so beautiful and so well planned out! Absolutely can’t wait until Friday to see the next part—it’s so very pretty and I love all the white cabinets, counters, etc.
I’ll be back on Friday 😘
Judy
LikeLiked by 1 person
Thank you so much! It has been quite a process and the results are worth all the planning!!!
LikeLike
Loved your content, Mellisa, such a wonderful blog ❤ thank you!
LikeLiked by 1 person